How to take a screenshot on Samsung Galaxy A53
This relatively new phone attracts people’s attention, because the Galaxy A53 is equipped with the 5th generation mobile network (5G). In addition, Android 12 support and One UI 4.1 are added values.
Samsung A53 5G was first introduced in March 2022 which has a design and specifications that are quite tempting to have. This mid-level phone has Exynos 1280 chipset performance with 4GB and 6GB of RAM on board.
One thing I like about this phone, because it has a super Amoled screen with a refresh rate of up to 120Hz. While the screen brightness is able to reach 800 nit. With provisions like this, of course, many are willing to spend money to get it.
Whatever we share on social media using Samsung A53 will certainly look good, because the camera already uses Quad sensor with 64MP main camera resolution. In addition, the screenshot images we make will look clear and not blurry.
Speaking of screenshot features, Samsung does not mess around in this case because they equip the Galaxy A53 phone with 4 screenshot features that users can use to save screen images or share to social media.
Want to know the screenshot feature on Samsung A53 5G and don’t know how to use it? check out the following explanation.
How to Take a Screenshot on Samsung Galaxy A53
Contents
By using the Samsung Galaxy A53 phone, we can take screenshots in several ways, namely with a combination of buttons, Edge panel, Gesture, Assistant Menu and of course a long screeshot.
We all always want a practical and fast way to screenshot the smartphone screen. Well, we will discuss how to screenshot Samsung A53 that is easy to do.
Screenshot With Buttons
The first Samsung A53 screenshot method is to use the volume and power buttons on the phone. Where we simply press the button together until the camera sound is heard. Please follow the complete procedure on how to screenshot Samsung A53 with the button combination below.
First, select the part of the screen that will be screenshot. Then press the Volume Down and Power buttons together and after that release them as soon as possible. If you release the button too late, the reboot or restart option appears instead.
If you do it right, a thumbnail of the screenshot will appear at the bottom of the screen and in a few moments it will be automatically saved in the gallery.
Screenshot Using the Assistant Menu

Samsung A53 also has another relatively practical way of taking screenshots. We simply activate the Assistant Menu feature in the settings then tap the icon and tap the Screenshot shortcut.
- Open the Settings app on Samsung.
- Scroll down and select Accessibility then select Interaction and Dexterity.
- Next tap the Assistant menu button to make it active.
- Now use the Screenshot feature found on the assistant menu by tapping the button.
- Once the Assistant Menu is open and select the Screenshot icon.
Long Screenshot
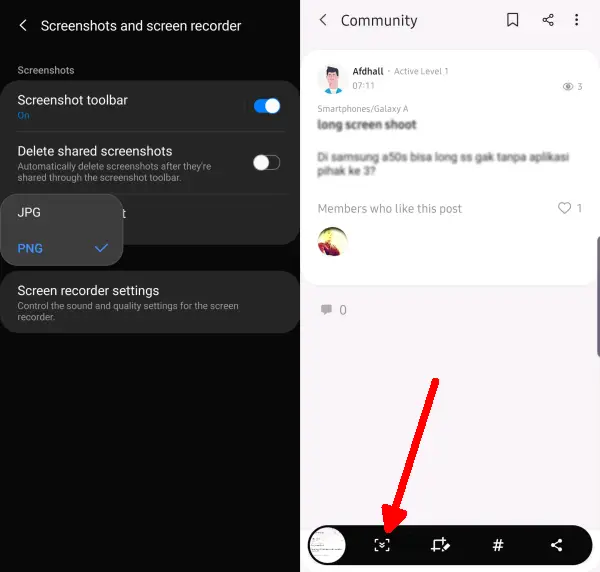
One of the interesting and useful features present in the latest version of One UI is Scroll Capture. To use it, you must first enable this feature in the Samsung A53 settings menu.
- Open Settings on Samsung.
- Tap Advanced Features.
- Select Screenshot and Screen Recorder.
- Now enable the Screenshot toolbar feature.
- Open the page where you want to take a long screenshot.
- After that, press Power and Volume Down together.
- A toolbar will appear at the bottom of the screen with tools to share and edit the screenshot.
- Tap the down arrow icon to take a long screenshot.
Screenshot with Palm Swipe

The Palm swipe to capture method has always been provided by Samsung on all their phones. You can quickly take a picture of the screen by simply swiping the screen with your palm.
- Enter the Settings menu then select Advanced Features.
- Find and tap Motion And Gesture and enable Palm Swipe To Capture.
- Open the part of the screen that you want to screenshot.
- Once this feature is turned on, take a screenshot by swiping the screen from the right side to the left using your palm.
- A few seconds later the Samsung A53 screen will blink.
- After that, the image will automatically be saved in the gallery or tap Share if you intend to share the image with social media or friends.
This way, you no longer have to install third-party screenshot apps, because everything is already on the Samsung Galaxy A53.
That’s some easy ways that you might be able to do for a screenshot of Samsung A53 5G with the features that are in the phone.