How To Install Havoc-OS Android 8.1.0 OREO ROM Nexus 5X
How To Install Havoc-OS Android 8.1.0 OREO ROM On Nexus 5X. Today, we have some great news for LG Nexus 5X users. Now your device can be upgraded to Android 8.1.0 Oreo via official build of Havoc OS custom ROM. All thanks to the Havoc-OS team to build this amazing custom firmware for Nexus 5X.
This is yet another ROM based on Lineage ROM, but Havoc comes with a specially designed and well-rounded user interface. The ROM also has system-wide burn in protection, spectrum support and OMS support. It also ships with OTA update support, which is always a welcome addition.
Havoc makes several tweaks to the battery consumption and modes to prolong the life on a single charge. This Custom ROM for the Nexus 5X also comes with an optimal battery charge level alert system. On the display side, the ROM offers a lot of features that not only make the AMOLED display on the smartphone shine but also take very little resources.
Overall it’s a robust experience and if you want a daily driver, Havoc OS is a worthy contender.
Make sure whether you have installed the required custom recovery software such as TWRP on 5X. Before starting the installation, our phone should have at least 60 percent battery charge. During the installation process, this full charge will prevent the unexpected shutdown as it is a threat to our device.
How To Install Official Havoc OS ROM Android 8.1 On Nexus 5X
- Download and transfer the Havoc-OS Oreo for the Nexus 5x dan Google Apps Android 8.1 to the internal storage.
- Boot your into TWRP recovery. you can use a small application from Google’s Play Store. Here are some examples of apps capable of booting TWRP Recovery Mode straight from the Nexus 5 homescreen: QuickBoot, ROM Manager, TWRP Manager, Flashify, and others.
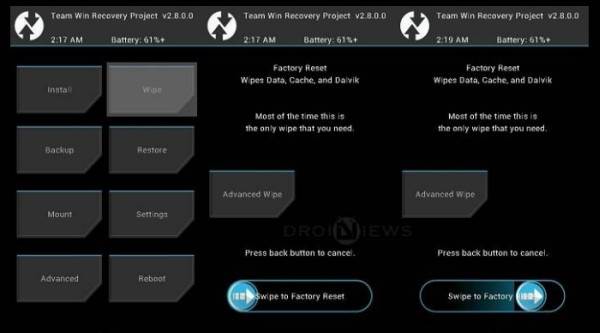
- As you’re in the TWRP recovery, make a complete nandroid backup of your device. You can follow our definitive guide for nandroid backup from here.
- Now, make a complete wipe of the device as we want a fresh installation. To make a clean wipe, just do a complete factory reset and also wipe the Dalvik cache.

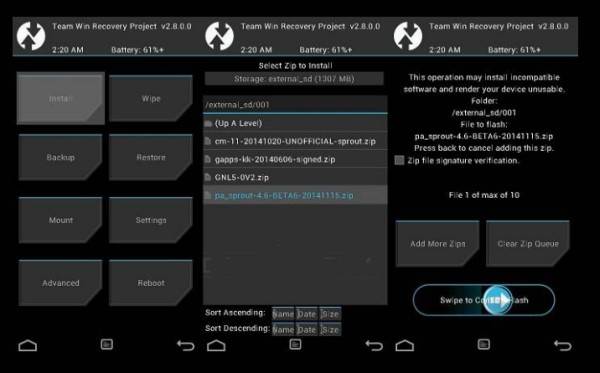
- Flash the ROM now. Choose the Install option from the recovery menu and choose the Havoc-OS-20180813-bullhead-Official.zip

- Similarly flash the Gapps package and wait for the process to complete.
- Reboot System your device once the files is flashed.
Performing all the above installations, our 5X is now ready with the best custom ROM and Android 8.1.0 update.
Tell us how things worked for you and share your Android experience with us and with other users by using the comments field from down below.